The COVID-19 has quickly changed almost every aspect of our lives, including our worship lives. Many churches are choosing not to hold worship services in person, but are moving online through recorded videos or livestreaming.
Unfortunately, many were not quite prepared to go online in such a short time and are left with few options. By following these simple steps, you can not only host a live worship service online, but it can done in a professional and helpful way that allows for viewers to easily follow along and participate, not just be spectators.
1. Install OBS
While you certainly can pick up a cellphone and begin streaming live on Facebook or YouTube, that can be a bit of a degraded experience for users due to sound quality and a single camera view. If you'd like to improve your livestreaming game, I'd recommend Open Broadcaster Software (OBS).
According to its website, OBS is "a free and open source software for recording and live streaming." Concordia Technology Solutions is not associated with OBS in any way, but this is my preferred software for streaming because it is easy to use and the price is certainly right.
OBS is available for Windows, macOS 10.12+, and Linux, and has a relatively quick installation process. The interface is a bit overwhelming at first, but can be easily set up to meet the needs of your congregation.
Depending on your settings, you might find that your livestream is a bit slow or choppy (that's what I found the first time I tested it). After some quick searching online, I found a blog post from StreamElements that has several suggestions that solved the problem for me.
The specific things I updated under Settings were:
- Settings > Output > Streaming
- Encoder: Set to Hardware (NVENC), Hardware (VCE) or Hardware (QSV)
- Enable Advanced Encoder Settings: Mark it as Checked
- Enforce streaming service bitrate limits: Mark it as Checked
- Encoder Preset: Set to Speed
- Settings >Video
- Base (Canvas Resolution): Set to 1920 x 1080
- Output (Scaled) Resolution: Set to 1280 x 720
- Downscale Filter: Bilinear (Fastest, but blurry if scaling)
- Common FPS Values: Set to 30
Your setup may be different and require different settings, but that is what I found worked well.
2. Set Up Devices
The next thing to do is to set up your audio and video. There are a lot of options out there and many of them will produce far better results than what I recommend below, but these two devices are sufficient for an initial setup.
 Audio
Audio
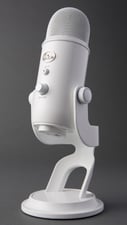
The ideal scenario would be for you to connect your sanctuary's audio feed into your computer. If you can't do that, or you aren't planning to be in the sanctuary, then I recommend using the Blue Yeti. It's a funny name, but Blue is the company and Yeti is the style of microphone. This microphone is adored by podcasters because of its compact design, easy setup, and low price tag. Although it's best used in small spaces, I've had success using it in worship services and even for recording organ readings. It's usually available on Amazon for around $130.
Video
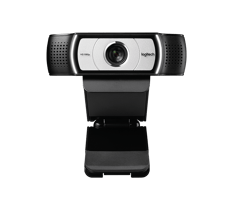
There are a wide range of options for webcams, but if you are looking for simple and inexpensive solution, then I recommend any Logitech 1080p HD webcam. I've used several Logitech devices over the years and they've always works quite well for me. They're not going to give you the clearest picture at a distance, but they get the job done at a great price point.
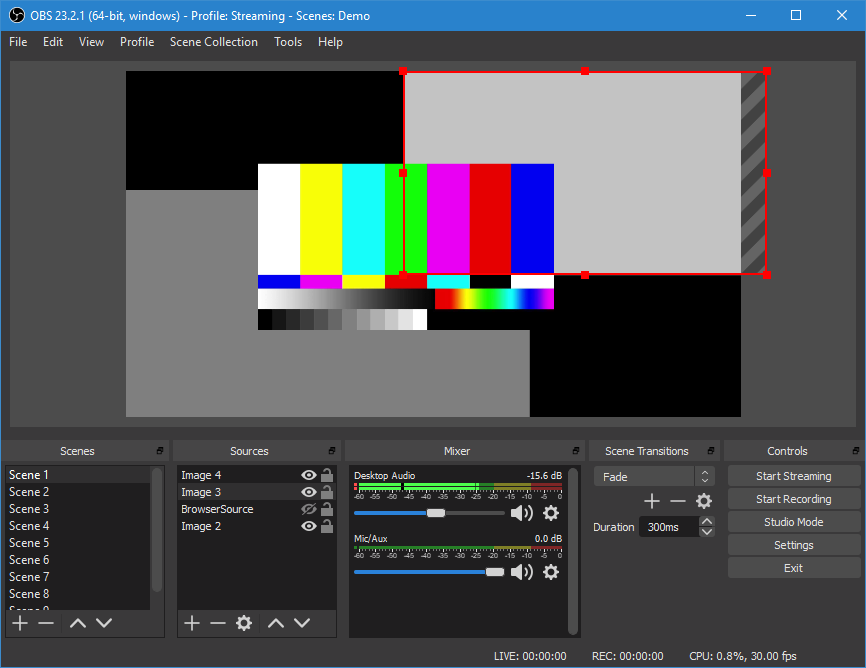
3. Set Up Scenes
Before doing anything else, I recommend starting by clicking on the Studio Mode button in the lower right corner of OBS. This will give you a split view with the Preview (what you will show next on the livestream) on the left side and the Program (what is feeding live) on the right side. I suggest doing this because it gives you a chance to modify what you are going to show next while always letting you see what is live.
The next step is to set up the different views, or scenes, in OBS. Think of scenes as different camera shots where you can add digital elements. A scene might be an image, a video, a capture of a web browser, or a simple video shot. There are the things I recommend to get started.
Primary Camera
While more than one camera makes for a better overall experience, a single camera view is all you need to get going. To do this, first plug your camera into a USB port on your computer. Then take the following steps in OBS.
- Create a new scene by clicking the "+" in the lower left corner under Scenes.
- Name the scene "Camera" and click OK.
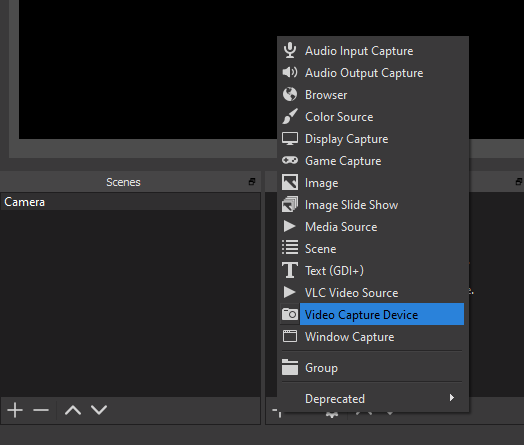
- Add the webcam by clicking the "+" under Sources and then selecting Video Capture Device.
- When you see the popup "Create/Select Source" use the default name and click OK.
- Select the appropriate device in the Device drop down and click OK.
- You will see the webcam feed in your Preview. Use the boxes on the corner to stretch it to fill the screen. Click and drag to move it around. It's OK to expand beyond the borders of the Preview canvas if you want to zoom in, just know your quality will decrease.
Title Slide
Following that same process, add a Title Slide. This is the slide that you will want to show at the beginning of your livestream so that viewers know you are about to start. By having a title slide, it removes the awkward time where you or someone else is staring at the camera asking "Are we live?"
- Create a new scene by clicking the "+" in the lower left corner under Scenes.
- Name the scene "Title" and click OK.
- Add the title slide by clicking the "+" under Sources and then selecting Image.
- When you see the popup "Create/Select Source" use the default name and click OK.
- Click Browser and select the appropriate file, then click OK.
- You will see the image in your Preview. Use the boxes on the corner to stretch it to fill the screen. Click and drag to move it around. It's OK to expand beyond the borders of the Preview canvas if you want to zoom in, just know your quality will decrease.
B-Roll Images
B-Roll images are static images that you can transition to when you need to take the camera off the live feed (to move or adjust the physical camera) or to simply make the livestream a bit more interesting.
The process is identical to the Title Slide process, but feel free to add multiple sources, naming them as to what is on the image so that you can easily find them when needed. There are eyeball images next to each source that allow you to hide the image from the scene so that they are not all showing at once.
Tip: the order sources appears from top to bottom is the same are the Z-index of your scene. In other words, the source that is on the top of the list will always overlay the other sources in the scene. You can use this to your advantage (e.g. if you wish to add your logo to the video).
When you go live, you can switch between these different scenes in OBS by clicking the Transition button in the center of the screen. Be sure to keep track of what is live and what is in preview; it's easy to confuse the two.
4. Schedule Live Video
Scheduling a live video is one of the trickiest parts because there are so many different platforms on which you can stream. For churches, I recommend using either Facebook or YouTube, and I'll describe how to schedule in each.
First, you must have a Facebook page in order to stream for your church. Individuals can stream from their individual profiles, but that makes it much harder for your members to find the video.
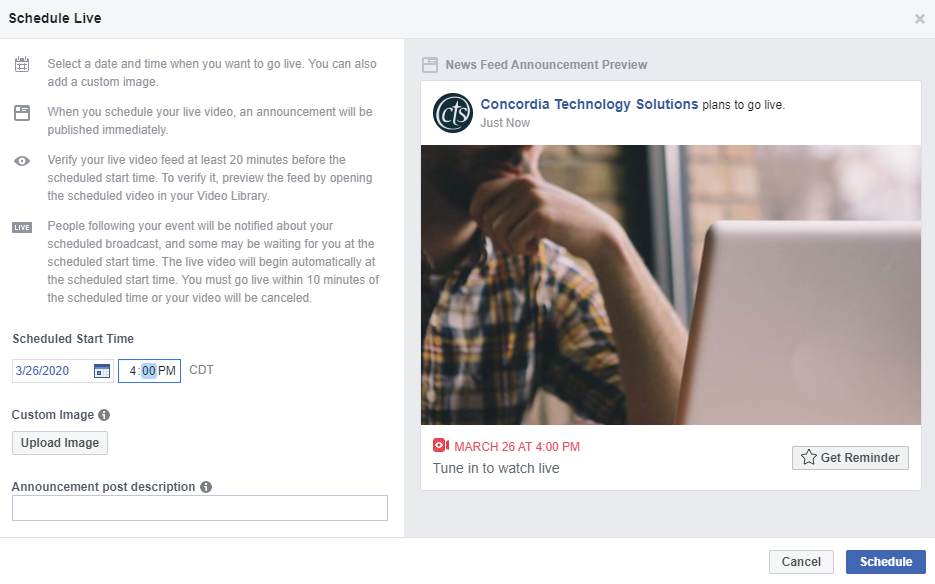
- When you are logged in to Facebook as the administrator of your Facebook page, go to Publishing Tools (you may need to click "More" first).
- Facebook will direct you to learn more about the Creator Studio. Click "Open Creator Studio."
- Once in Creator Studio, click "Create Post" and select "Go Live" (don't worry, you won't go live automatically).
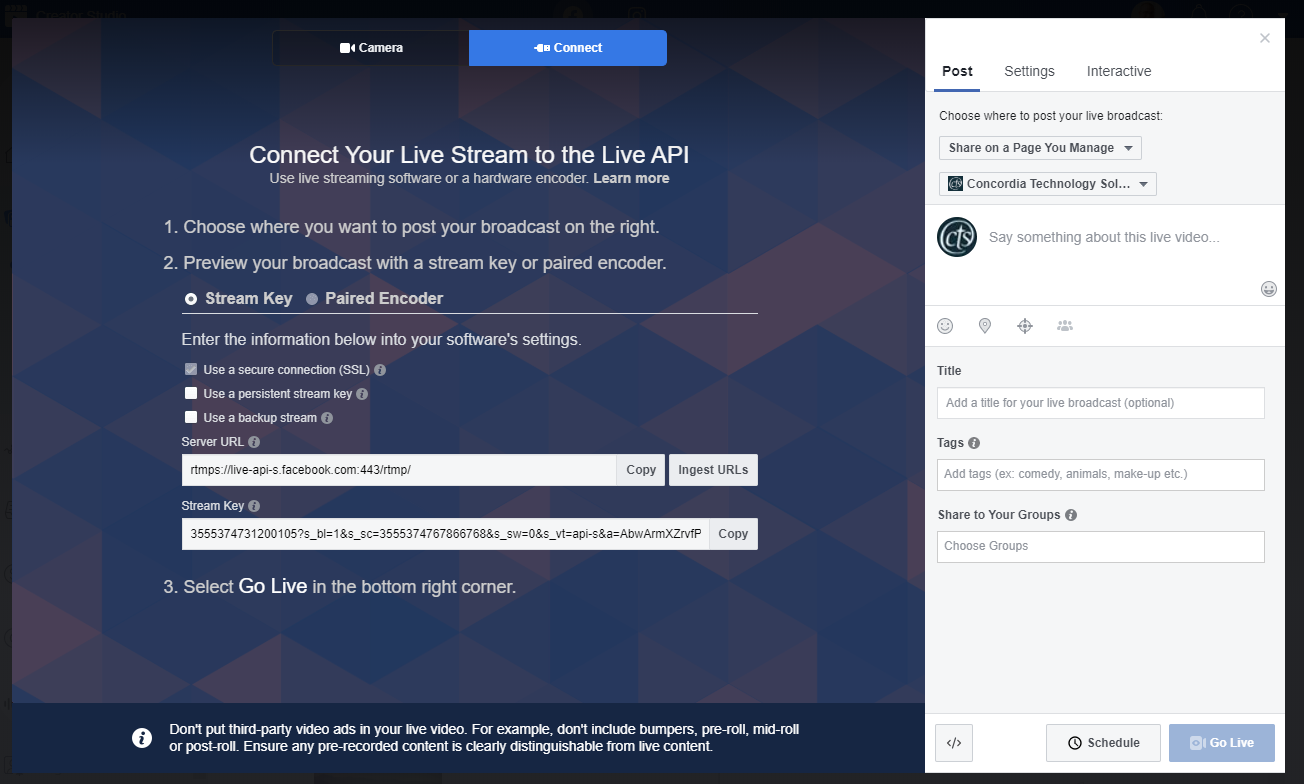
- This will take you to the Live Stream view (see image below). From here, you enter describe your video, enter a title, add tags, and schedule the video. You'll also have access to the Stream Key (this is important for OBS).
- After entering those details, click "Schedule".
- The screen will allow you to pick the scheduled date and time. You may only schedule videos between 10 minutes and 7 days from when you create them.
- Upload a custom image for your video, or stick with the default, which is your cover image.
- Click Schedule.
Your scheduled Facebook Live will be announced in your notifications, and will be sent to your followers. You can click on that notification to get the URL which can be shared off of Facebook to the members of your congregation.
YouTube
You must have a verified channel in YouTube in order to stream videos, and there is a 24 hour wait period, so be sure to plan ahead for this one.
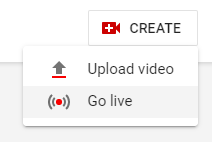
- Log in to YouTube using your Google ID and go to your Channel.
- Click YouTube Studio.
- Click Create and select Go Live.
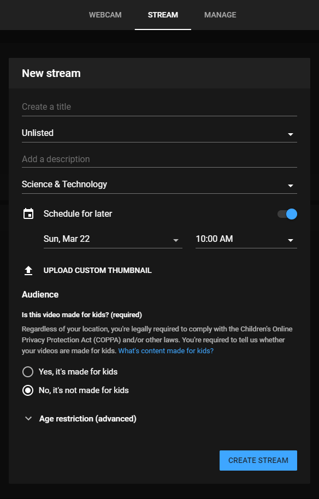
- The New Stream window will appear. Enter a title, description, and permission level for your video (you'll probably want Public for worship services).
- Select a scheduled date and start time, then click Create Stream.
This will direct you to the video page where you can click Share and get a link that can be distributed to your church members.
5. Make Final Preparations
You're almost ready to go! There are a few simple things I like to try to remember when streaming a live video.
- Turn off your cell phone. Yes, we all know we're all supposed to do that, but a gentle reminder is never a bad thing.
- Put up signs letting people know you're streaming. Especially if this is your first time, people may not be expecting you to be filming, and if they see you filming, they may not realize you are live on the internet.
- Relax, it's no different than talking with someone face-to-face. I understand it can get nerve wracking to be live on video, but remember that you are used to speaking with the same people face-to-face every day, the only difference now is the camera. Plus, if something goes really wrong, you can cut the feed and delete the recording.
6. Go Live
This last step is probably the least intuitive, but it's really not too difficult: you need to send your feed from OBS to your livestream, which means you need your stream key.
This will vary slightly depending on your streaming service, but here is how to do it with Facebook and YouTube.
- Log in to Facebook as the administrator of your Facebook page.
- Scroll down on your page's feed until you find the announcement of the live video (this isn't very intuitive, but there isn't a better way, I've looked).
- Click in the lower right hand corner of the post where it says "Admin Only: Edit Your Details."
- This will cause your Live Stream view to appear again. From here, you can see the stream key and click Copy to copy it to your clipboard.
YouTube
- Log in to YouTube under the same account as your channel.
- Navigate back to YouTube Studios.
- Click on Videos, then click Live.
- Hover over the scheduled live and click View in Live Control Room.
- You will taken to the Live Control Room and a modal will appear with your stream key. Click the Copy button to copy it to your clipboard.
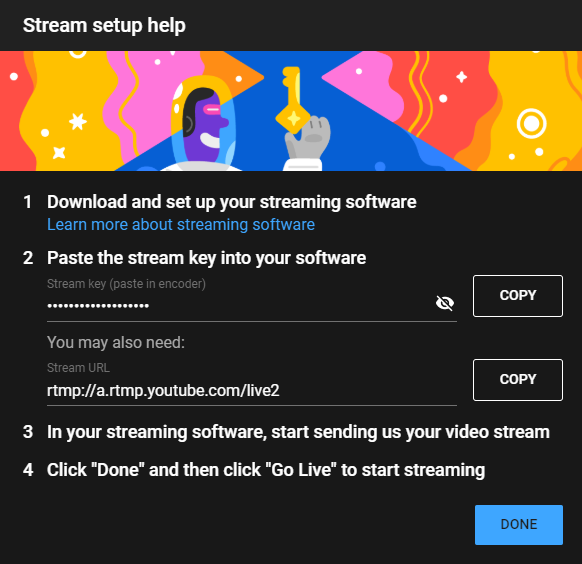
Enter Your Stream Key into OBS
Next, you must enter that stream key into OBS so that it knows where to send the feed.
- Click on Settings in the lower right hand corner.
- Navigate to Stream and click in the field that is titled Stream Key.
- Select all and delete, then paste in your new stream key.
- Click OK.
You are now ready to stream! A few minutes before you start time, click Start Streaming in OBS to send your feed to your livestream platform (Facebook or YouTube).
Starting Your Live
Once you are ready to start streaming, you can wait until the clock counts down to your start time and have the livestream begin automatically, but I prefer to do a manual start about 30 seconds before my scheduled time. This allows me to check it out on my phone and make sure it has started (with the title slide, of course), and then I can begin presenting.
A couple things to note for the beginning of the livestream:
- As soon as you start streaming from OBS to your platform, your audio can be heard. Make sure you mute your microphone until you are ready to go.
- Very much related: make sure you unmute your mic when you start!
- Make sure you desktop audio is muted. There was an embarrassing incident when my desktop audio fed into the live feed and my live video was playing in the background. It created a horrible audio infinity loop. Trust me, you don't want that to happen to you!
- Know that there is a several second delay between what you are presenting and what your viewers are watching.
- Check the comments of your live video at the beginning as that will let you know whether people can hear you or not.
While You Are Live
There are only so many thing you can do while you are live other than present, but there are a few things you should be monitoring as much as you can:
- Watch the comments in your livestream. Viewers will let you know if the video or the audio is bad, or if something else is going on that you are not aware of.
- If there are questions or comments from viewers, be sure to engage them. Obviously you can't do that if you are leading worship, but a reply to a comment after the fact will let your viewers know you were paying attention.
- Keep an eye on the Program view of OBS; you always want to be aware of what people are seeing.
Ending Your Live Stream
Ending your livestream is the easiest part; all you have to do is click Stop Streaming in OBS or on your livestream platform. I prefer to do so in OBS so that I know the time delay won't cut things short, but either works just fine.
I would recommend having a closing slide with information about how to contact you or when the next livestream will be, but that is completely optional.
Does this seem easier or harder than you thought? I’d encourage you to give it a try. While there are a lot of moving parts, it’s not that hard to do once you get the hang of it, and the benefits are great, especially in times like this.
Please let me know if the comments below if this was helpful and if I am missing any steps!
See these steps happen in real time by watching a recording of a live video that Peter hosted on March 19, 2020. Each of these six steps are shown in detail as Peter prepares for and hosts a live video.